Tuesday, April 29, 2008

Peanut Butter and Chocolate....


......my favorite sweet combo.

Anna over at Cookie Madness always has yummy treats coming out of her oven, but these pb chocolate brownies really called out to me, especially when Anna pointed out that the peanut butter mixture does not use cream cheese. Don't get me wrong, I do like cream cheese swirled-brownies, but when it comes to peanut butter, especially when it's paired with chocolate, I want the peanut butter to be front and center. Cream cheese tends to dominate and tends to make things a tad too sweet.

166-6694_IMG

To make the ribbons, you melt together the peanut butter, peanut butter chips and butter and then spread it out on wax paper. As you can see, I was not all that neat about this part.

166-6696_IMG

While the peanut butter mixture is chilling, you mix up the batter. Once the batter is ready, the pb mixture can be taken out of the fridge and cut into ribbons. Half the batter goes into the prepared pan and topped with half the pb ribbons. The remaining batter is gently spread over top and then the brownies go into the oven. After the brownies are finished baking and while they are still warm, the rest of the pb strips go on top. They are a bit more work than I am used to in a brownie, but worth every bit of it.

PB Brownies
These brownies are delicious. In fact, DH immediately requested that I make them again. The brownies are moist and chocolaty and the peanut butter flavor in the ribbons really comes through. I used Smucker's Natural PB and though I haven't tried it with regular PB and therefore have nothing to compare it with, I have a feeling the natural PB kicks up the nutty flavor even more and I wouldn't try it any other way. The only thing I might change is to put all of the peanut butter inside the brownie - I wasn't all that fond of fussing with the peanut butter strips and trying to get them to look nice.

This recipe is definitely a keeper. We tried them out on a fairly large crowd and everyone raved about them.

Monday, April 28, 2008

Creating Pathways in the Garden


Yesterday was quite nice out and I had a trunk full of free mulch I had picked up in town, so DH and I seized the day and decided to create pathways between our lasagna beds.

First, I pulled back the black weed barrier and found a surprise guest:

167-6787_IMG

Bailey was curious, but cautious:

167-6789_IMG

Bailey supervised as I got ready to mow the grass around the beds as short as possible:

167-6783_IMG

Next, I laid down a layer of cardboard and soaked it with a hose. Note to self: Putting down cardboard goes much faster than using newspaper! Second note to self: Since it goes so fast, it couldn't possibly hurt to put down 2 layers next time.

167-6790_IMG

A thin layer of mulch goes down on both pathways. I kept the pathways fairly wide because originally I was thinking I would need to get a lawnmower in between the beds. I decided to keep them wide anyway since I'll still need to get the wheelbarrow between the rows and we certainly have plenty of space, so may as well give myself plenty of room to work.

167-6791_IMG

Almost as soon as the mulch went down, I decided that it was probably a mistake. The idea behind mulching the pathways was to cut down on having to mow and try to keep the grass from encroaching on the garden beds. However, the more I thought about the mulched areas around our yard, the more I thought about all the weeding I have to do in those mulched area. Mowing grass in a narrow pathway would go WAY faster than weeding. I'm starting to think that keeping grass between the pathways would actually be the lower-maintenance option.

Instead of immediately ripping it all out, I decided to leave it for now. We'll build 2 more beds this season and leave the grass in place - this way we can have it both ways and see which way ends up being less work. Having it both ways will certainly bother the anal part of me that likes things to be just so, but it will be a useful learning exercise, so I'll try my best to overlook it.

I dug a trench around the remaining borders of the beds to discourage the grass from trying to take over the beds:

trench around bed

Next project - hopefully to be completed next weekend as long as the weather holds out - a fence to keep out the bunnies. But so far this week is looking rainy and cold, so who knows when we'll get out there again............

Lasagna Gardening


NOTE: This post was started last fall. Rather than rewrite it, I'll just add to it........

Sadly, it's almost time to hang up the garden tools and begin hibernating until spring. On the one hand I'm looking forward to turning my attention indoors - there are many projects that need my attention - projects that have been neglected all summer long as I played outside. On the other hand, this was the first summer in a long time where I actually enjoyed doing yard work.

The weather was largely responsible for my change of heart - it was dry and sunny and not too hot most of the summer. Perfection. Another reason I enjoyed it was that I tried to approach things from a different angle. Instead of viewing the work as a list of chores that needed to be checked off, I tried to use the work as my excuse to get outside and enjoy the beautiful weather. I also worked with fewer time constraints. So what if I only have a 1/2 hour to put down mulch? The pile will still be there tomorrow and the next day. It will get done eventually. I have a lot more fun doing just about anything if I don't feel I have to finish it right this minute.

In keeping with my more relaxed approach, I am experimenting with a new-to-me way of gardening, Lasagna Gardening. Lasagna gardening is a method of gardening introduced by Patricia Lanza in her book by the same name. The aspect of this type of gardening that appeals to me most is that you build up instead of digging down. Instead of toiling for hours and hours digging out sod, tilling the soil, and then turning it over and working it every spring and fall, you build your garden up - no digging, no turning, no back-breaking labor. Well, there IS labor, but it's the kind of labor I don't mind so much. I don't know yet if I buy her "no weeding" claim yet, but we'll find out this spring and summer!

Fast forward to this spring..........

So where were we. Ah yes, building up rather than digging down. Not unlike the edible lasagna, lasagna garden beds are a series of layers. This is another appealing aspect of lasagna gardening because these layers are made up of things you can find around the yard or in your community. I try to use as many free things as possible, but there are still a few things I have to buy. (I haven't reached the point of fanatacism where I'm willing to visit farms and ask for - much less cart in the back of my car - free manure. But check back in a few years and see if I'm still holding out........)

160-6060_IMG
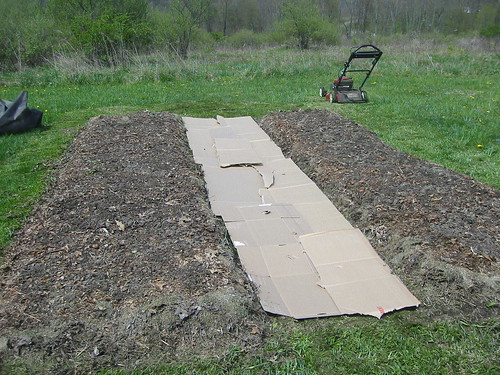
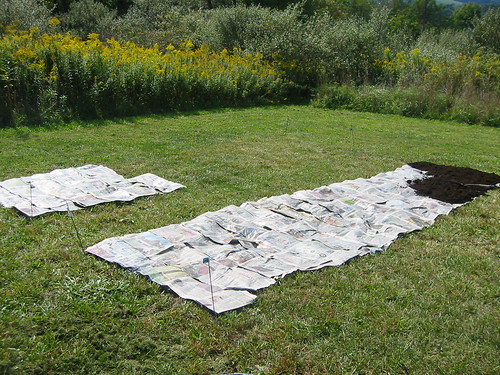
First, a thick layer of wet newspaper.

The layers start off with wet newspaper or cardboard as a barrier against the grass and weeds. Our basement is currently overflowing with newspaper and cardboard in anticipation of creating several new beds this year as well as pathways between them. What a great way to recycle!

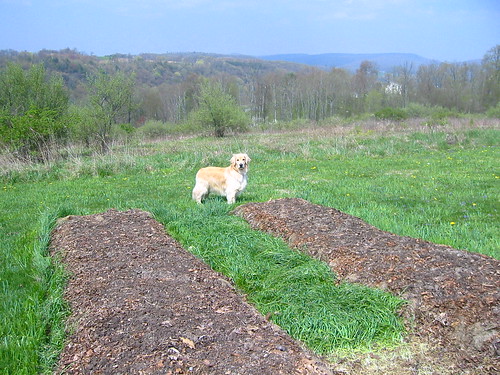
As you can see from the pictures, we have opted to try open beds. Many folks build planting boxes to help contain the beds, but again, I'm going for minimum effort and expense, so we're trying open beds first. We can always build boxes later if open beds don't work out.

Once the newspaper or cardboard is down, you begin to build layers of organic material, mixing carbon-rich materials (brown) like leaves, with nitrogen-rich materials (green) like grass. (Check out this list for other sources of brown and green materials.) Part of the fun of this stage is trying to find as many free organic resources as possible.

After the newspaper layer, we wanted to use something with a bit of weight to it (as opposed to leaves or straw) to help hold down the newspaper, so we went with peat moss. Peat moss is recommended in Pat Lanza's original book, but apparently she has backed off from using it because of questions of sustainability and because it really doesn't add much in the way of nutrients to the soil. It's also expensive and doesn't fit into my free and easy scheme, so I'm more than happy not to use it. (This year I plan to use free mulch instead.) Our next layer was a layer of straw (which I have to buy, but it's fairly cheap) followed by grass and then leaves. The grass and leaves are free and abundant although I have to scavenge the leaves.

161-6165_IMG
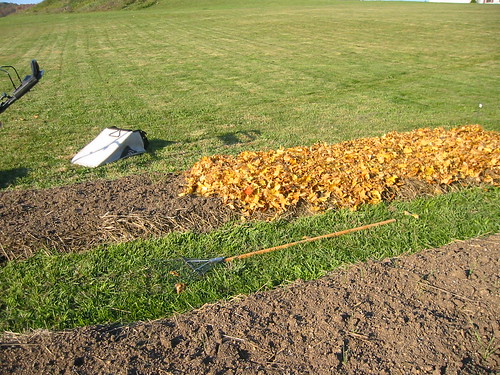
Here we've added straw, hummus/manure and we're
starting on the leaves. (The leaves really should be
chopped smaller than that for best results.)

With our 1+ acre of lawn, we have plenty of free grass. What we don't have is leaves - we live on converted farm land and the residents here haven not been good about planting trees, which is a shame. But I still get them for free! First I offered to rake my neighbors yard - a win-win - he gets out of some raking and I get free leaves. This worked okay, but was a lot of work - raking and then mowing the leaves and my mower really didn't break the leaves down enough and I could tell it wasn't going to give me enough leaves anyway.

Then I read a tip about using the mulched leaves that many towns pick up curbside. Many towns, mine included, have sites where they dump the leaves and other lawn waste and leave for residents to haul away for free. I have to admit that I get some rather strange looks when people see that I'm taking leaves OUT instead of bringing them IN since most people have more leaves than they know what to do with! But at least I didn't have to resort to having my son jump out of the car and pick up bags of leaves off the curb in front of other people's homes! He (13 years old) wasn't too keen on that idea. This has worked out great - not only to I have access to a LARGE supply of leaves, but in many cases they are already mulched. I just bring my gloves and some big black lawn bags and start stuffing.

162-6215_IMG
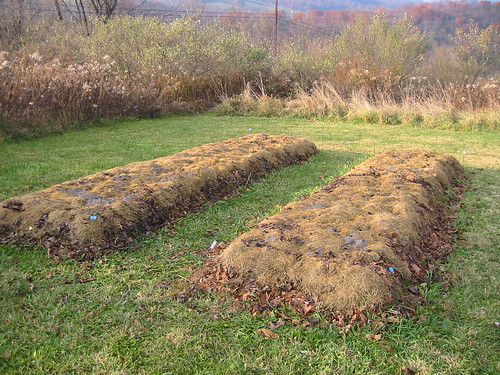
We built the beds about 18 inches high and then let them
sit all winter.

So anyway, we continued to alternate mostly leaves and grass but we also added composted manure/hummus (bought from Lowe's or Walmart) and a bit of straw. Straw doesn't break down all that easily, so I put it down toward the bottom thinking that maybe it would break down faster if it were underneath a lot of other material. We'll see. One drawback I've found with straw is that it tends to sprout, but the sprouts were easily weeded out. I've read that you can get sterile straw but apparently mine was not.

167-6750_IMG
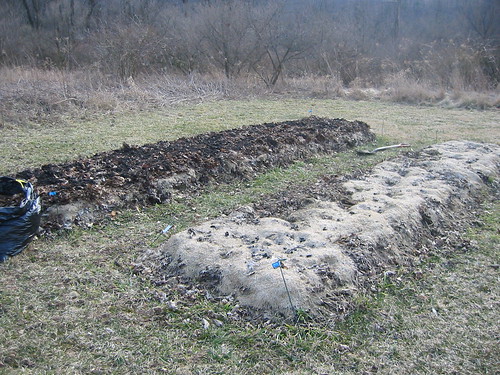
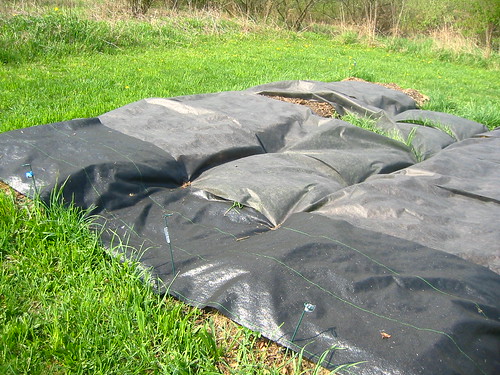
Earlier this spring I added another layer of leaves and some
hummus/manure and then covered the beds with black
weed barrier to let them "cook".

167-6780_IMG
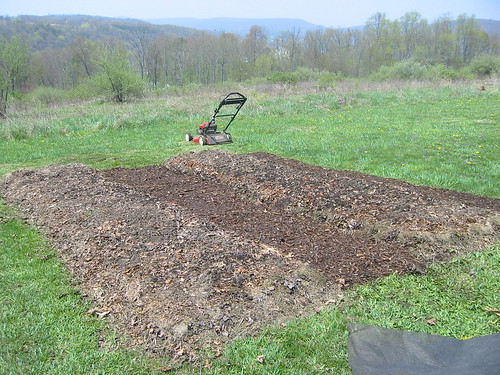
Apparently some of the weed barrier I bought didn't work so well
because the grass underneath kept right on growing!

I've done a bit of reading and am trying to approach this in the most relaxed manner possible. At first I agonized over how much newspaper to use, how tall the beds should be, which organic materials to use and how much of each material and on and on. Now I've decided to just throw it on, see what happens and learn along the way. Again, my plan is to find out how little I can do and still have great results, so it makes sense to not agonize over exact proportions and to start out with a slightly shorter bed and see if that works before I decide that I must have a strict ratio (which makes it harder to build beds in certain seasons if you don't have access to certain things) or that the bed MUST be 24 inches high, etc.

The beds we have built are about 3 x 8. The idea is to make the beds easily accessible from all sides so that you never have to actually step IN the bed. This will help keep the soil from compacting, keeping the soil loose to promote root growth and making it easier to pull weeds.

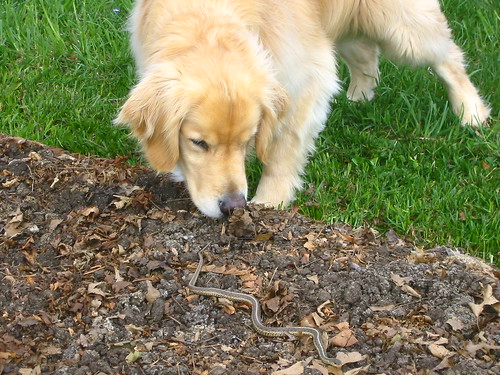
Now supposedly you can build the beds and plant in them right away, but I liked the idea of having the beds ready to go once spring time came. I also figured that letting them sit over winter would help break down the layers a bit, hopefully creating a bit of worm-infested, rich soil in which to plant. I have stuck my hands in the layers and sure enough, I did find more dirt than was there before and worms too! Exciting!

Whew. That should do it for a first post about lasagna gardening. Our upcoming projects are to build a fence, create pathways between the gardens using cardboard and mulch (again, free from the city), create a proper compost area, and create at least 2 more beds. I will post as things progress and hopefully in a few months I will be taking pictures of our bounty! I'm definitely trying to enjoy the building process because I have control over this part. Once the plants go in, it's time to do battle with critters, pests, the elements - all the things that conspire to bring your garden down. But I'm determined to prevail this year.....the trick will be to do it without chemicals........

Here are a few articles on Lasagna Gardening:

Gardening in layers

Lasagna Gardening

Lasagna Gardening 101

Building Soil Nature's Way


Sunday, April 27, 2008

A Taste of Yellow: Seared Halibut with White Asparagus, Tomato Concasse & Yellow Pepper Coulis


.
Food.

It brings us strength and brings us together. It is, in it's way, the one true elixir.

With a bit of free time on my hands I made this dish for Barbara and the A Taste of Yellow LiveSTRONG event. (Which actually asked us to incorporate a Lance Armstrong Foundation Yellow bracelet in to the photo, but I didn't have one.)

It is complex, as life is, and delicious as life should always be.

Try it my peaches, and taste the joy.

4 yellow tomatoes
1/4 cup minced parsley
grapeseed oil
Zest of one Meyer lemon
salt

2 yellow bell peppers
1 clove garlic
4 each dried apricot
white pepper
white wine vinegar
1 Meyer lemon
2 tablespoons butter
pinch of sugar

1 pound white asparagus
2 tablespoons butter
salt

4 six ounce pieces of halibut
2 tablespoons grapeseed oil
2 tablespoons curry powder
black pepper
salt

Prepare a large bowl of ice water.

Bring a small pot of salted water to a boil. Using a small knife, make an “x” on the bottom of the tomatoes and core the stem from the other end. Blanch the tomatoes in the boiling water until the skin is just beginning to curl (about 45 seconds) and remove to the ice water bath to stop the cooking. Drain and peel. Slice in to the tomato vertically and follow around to cut out the seeds and core, then lay the flesh out flat and dice small. Toss this with the minced parsley and grapeseed oil. Do not season with salt until you are ready to plate.

Roast the yellow bell peppers over an open flame until charred on all sides. Place in a bowl and cover with plastic wrap to steam. After five minutes, rub off the charred skin and remove the stem and seeds.

Meanwhile, in a (very) small sauce pan, simmer the garlic and apricots in a small amount of water (just enough to cover the bottom of the pot.) until the apricots are soft and the water evaporates.

Puree the bell pepper, garlic and apricots in a small food processor. Taste and add white pepper, white wine vinegar and lemon juice to taste. Strain through a fine-mesh strainer and set aside.

To make the asparagus. Trim the very ends and peel the stems all the way to the tips (leaving the tips in tact.) add to a sauté pan in a single layer and add just enough water to cover half way. Add the butter and salt and simmer until the water has evaporated and the asparagus is cooked through (with white asparagus you want it cooked all the way.)

Meanwhile, season the presentation side of the fish with the curry, pepper and salt. Heat the grapeseed oil in a small skillet and sear the fish, turning once, until cooked through.

To plate. Drizzle some of the yellow pepper coulis onto a large plate. Lay out the asparagus, then top with the fish and the tomato concasse. Season with salt and serve.

© 2008 Fresh Approach Cooking

______________________________________

© 2008 Rachael at "Fresh Approach Cooking" www.freshcatering.blogspot.com This RSS Feed is for personal non-commercial use only. If you are not reading this material in your news aggregator, or at the aforementioned url, the site you are looking at might be guilty of infringing upon terms of copyright.

Concasse - Applying to raw or cooked tomatoes: Peeled, seeded and diced.

Human epidemiologic studies have suggested that eating cruciferous vegetables like broccoli is associated with reduced risk for bladder cancer. - Today's Senior

LiveSTRONG with A Taste Of Yellow has been accepted by the
Lance Armstrong Foundation as an official LiveSTRONG Day event.

Friday, April 25, 2008

Hello? Is anybody out there?


Oy. I only meant to take a few weeks off, but it turned into a couple of months! Life's been very busy and still is, but I'm going to try posting even just once a week to see if I can get back into the groove of things.

I've missed blogging, but on the upside, I have gotten a lot of things accomplished. I won't go into all the boring details, but one exciting thing I accomplished was painting all four bedrooms upstairs! Now that the weather is really nice, know I'll be very glad that I got it done over the winter so that I can focus my attention on the outdoors and the garden. Speaking of the garden, more on that in a later post.............

It's hard to figure out what my first post should be after being absent for so long! Since I left off last with a savory recipe, let's go sweet. I don't bake much these days. As much as I love to bake, it's just not good for the waistline, so I've cut back rather dramatically. It's not as much fun, but we're healthier for it.

If you like to bake and you like cookies, chances are you might be interested in this recipe. If not, you'll be bored by yet ANOTHER chocolate chip cookie recipe. Obviously I'm never bored or tired of them.....

This one was posted by a fellow blogger and member of the CLBB, Laura from The Spiced Life. Her raves about the flavor and texture of this cookie made me decide that it was definitely worth a try.

As I've probably mentioned here before, I'm a chocolate chip cookie snob - meaning I have a very definite idea of what I want out of a chocolate chip cookie and most cookies fall short of what I want. While these cookies are not quite as buttery as I like, I think the trade off for the texture is probably worth it - they are fabulously chewy -and chewiness ranks second right behind buttery flavor in what I look for in a chocolate chip cookie.

Unlike Laura, I usually like the taste of chocolate chip cookies BETTER the next day - the buttery flavor deepens as they sit - so that is not an issue for me. The use of peanut butter in the batter was intriguing. I also found it interesting that the batter only called for one stick of (per 2 cups of flour) - most of my favorite recipes call for two sticks.

Chocolate Chip Cookies
I think I would dub these "Bill Yosses' Best of Both Worlds Chocolate Chip Cookies". They look and feel like a shortening cookie - if I saw this cookie on a plate somewhere, I probably would turn up my nose and pass it by because it really looks like a shortening-based cookie - it's thicker and it holds its shape well. But since they are made with butter, they don't have the boring flavor of a shortening cookie - you can taste the butter. They are not as deliciously buttery as a Toll House (one of the 2 sticks of better recipes), but like I said, the texture is so wonderful and they don't spread like so many do, I might be willing to give up the extra butter. The taste of a butter cookie with the texture of a shortening cookie - the best of both worlds. It is my theory that the peanut butter acts sort of like shortening but without actually giving it a peanut buttery flavor and certainly not the crumbliness I associate with an out-and-out peanut butter cookie.

With both batches, I used 1 teaspoon of vanilla, no vanilla beans and Smuckers Natural PB. The first batch I made I decided to use up some open bags of chips, so I used a half bag of peanut butter chips and a half bag of semisweet chips. I also chilled the batter for several hours because I was unable to bake them right away. I baked them for about 10 minutes. The cookies came out fine, but I didn't like all the chips. I'm one of those weird people who don't like many chips in my chocolate chip cookies - I want to taste the cookie part.

The second time I made them, I used one cup of Ghirardelli's bittersweet chocolate chips - my preferred chip for baking cookies. I baked them at 350 (my oven runs hot) for about 12 minutes WITHOUT chilling them. They came out even better. I think that chilling is definitely not necessary for these cookies and I actually think they had a better texture this time around (although the chips in the first batch may have contributed to that).

I forget exactly how many cookies I got - about 3 dozen (more the first time since there were 2 cups of chips).

Ahh, it feels good to post again. I hope someone is still out there checking on my neglected blog and that everyone hasn't given up on me entirely. Although I know I'd keep posting even if no one was reading, just because it's fun.

Tuesday, April 22, 2008

Make Your Own Boursin-Style Cheese


.
I am filled with the joy of the season. The soft light of spring with it's promise of the new. I am just a big ol' puddle of happy-person.

Yesterday, upon waking, I could just smell it in the air. Picnic season had arrived.

Fab-tastic! (Insert girly-squeal.)

And you know full well by now that nothing makes me flash my pearly whites like a sunny day, a relaxed destination and a basket full of comestible wow.

Nothing beats it. Don't you agree?

So after a rousing go round on the Santa Monica Pier Ferris Wheel (which - as I write - is for sale on eBay. No, I'm not kidding.) we had worked up an appetite for something just so. Basket in tow, we made our way out to the sandy beach and indulged.

It was just what we needed to pair with our locally produced wine and home-made crackers.

Smooth, tangy, creamy...you know. All those things you look for in a cheese-spread kinda thing on a perfect spring day.

Now sweet peaches, I could ramble and raconte on the serious subject of copyrights, copyright infringement and boring legal mumbo-jumbo style speak for a few moments prior to sharing this most delightful recipe, OR I can just warn you (sternly) that Boursin is trademarked and (lovely) delightful and not at all this recipe.

I hopes to tells ya.

Nope, this recipe is just for something somewhat (but assuredly not) similar. Basically, its a soft, spreadable, flavored cheese. Whimsical and tasty.

So try it my peaches, and taste the joy.

2 ounces goat cheese
1 ounce cream cheese
1 ounce butter
2 teaspoons grated Parmesan cheese
1 teaspoon lemon zest
1 teaspoon orange zest
1 teaspoon minced fresh oregano
1 teaspoon minced fresh chives

Using your hands, smoosh everything together and form into a nice disk. Pat, while smiling then serve with crackers.

Yup, its that simple, elegant and ready to devour.

© 2008 Fresh Approach Cooking

______________________________________

© 2008 Rachael at "Fresh Approach Cooking" www.freshcatering.blogspot.com This RSS Feed is for personal non-commercial use only. If you are not reading this material in your news aggregator, or at the aforementioned url, the site you are looking at might be guilty of infringing upon terms of copyright.

Boursin's traditional cheeses (Garlic & Fine Herbs, and Pepper) are certified kosher by the Orthodox Union. Boursin is also proud to support the Susan G. Koman Breast Cancer Foundation.

Faced with rising demand and empty shelves, officials at a New Hampshire's
Fall Mountain Food Pantry are asking area farmers and gardeners to "grow a row" for them and donate the food.

Monday, April 14, 2008

Roasted Cherry and Hazelnut Salad with Warm Cheese


.
I tell you kids, there are stars dancing in my hazel-colored eyes.

On Saturday night, after a delish dinner of fish tacos (natch), The Ombudsman and I moseyed on up to the spectacularly awesome Griffith Observatory to check out the rings of Saturn and craters of the moon at their monthly star-gazing lawn party.

What can I say…it was celestial. The evening was balmy, the city lights were a-twinkle (oh yea. A-twinkling.) and the mood was just right.

Makes a girl want her own telescope, (and a space walk!) I tells ya…but I would probably use mine to spy on the neighbors as often as I would spy on the heavens.

(Oh admit it, so would you.)

Actually, I think I’d just like it to zoom in through a restaurant window and just take a little look-see at what people are eating. How fun would that be?

The first place I would zoom in on (with my magic telescope) would fer sher be the Zuni CafĂ© up there in San Francisco. (What? It’s an imaginary magical telescope! I can look anyplace I want!)

They are legendary and just a tiny peek at their world-famous roast chicken would be worth the effort (of calibrating my magic telescope to do such a thing.)

I think I would also have to patiently wait, watching every order to check out how they plate this salad. Since it is also from their cookbook (renowned, beloved and beyond delightful) and I am curious what their version would look like.

Mine was a riot of colors. Reds and greens, creamy white and burnished gold. Come to think of it, much like the rings of Saturn itself. The only difference between my version and theirs is that their recipe (I found) was a bit fussy, so I’ve paired it down a scoatch.

The main thing here is that cherries are oh-so-very not in season here in North America land, so unless you have some frozen and are in a defrosting kinda mood (which I actually was. These beauties were picked in Washington last summer, expressly for me. Awww…) I would suggest giving this another month or so before trying (cruel, aren’t I!)

Now try this my peaches, and taste the joy.


1 cup whole cherries (with the pits)
1/4 cup olive oil
1 ounce Kirsh
2 Tablespoons Raspberry balsamic vinegar
8 ounces mixed greens (I used something called California mix from Bristol Farms, I quite liked it, since there were lots of fuschia colored greens tossed in)
6 ounces Saint-Marcellin cheese,
8 slices toasted baguette (crostini)
Salt and pepper

Preheat your oven to 350F.

Rub the cherries with a few drops of olive oil, season with kirsch and a pinch of salt.

In a small bowl whisk together the oil, vinegar, salt and pepper. Add a few drops of the kirsch, taste and adjust seasonings as needed.

Slice the cheese into six equal portions.

Place each portion of the cheese on top of a crostini on a parchment lined baking sheet. Place the cherries on another sheet pan. Roast until the fruit is near bursting and the cheese is beginning to slouch, about 6 minutes,watching the cheese carefully.

Dress the lettuces and hazelnuts very lightly in the vinaigrette and arrange on six plates, leaving the nuts behind for the moment. Garnish with the warm cherries and their juice and nest the warm cheese crostini next to each salad. Sprinkle hazelnuts over the top of the salads. Season with salt and pepper and serve with additional slices of toasted peasant-style bread.

© 2008 Fresh Approach Cooking
______________________________________

© 2008 Rachael at "Fresh Approach Cooking" www.freshcatering.blogspot.com This RSS Feed is for personal non-commercial use only. If you are not reading this material in your news aggregator, or at the aforementioned url, the site you are looking at might be guilty of infringing upon terms of copyright. This means you choice cooking recipes. Stop stealing my content.

Kirsch, also known as Kirschwasser, is a fiery clear cherry brandy made of black cherries and their pits.

Zuni Cafe is located at1658 Market St.(bet. Franklin & Gough Sts.) in San Francisco, CA.

Broadway in New York City shifts west at East 10th Street because a cherry tree once stood there.

Tuesday, April 8, 2008

Dark Chocolate Tartlet


.
Hmm. I'm not entirely convinced that looks nearly as tasty as it appeared in real life. I mean, it was ooey-gooey chocolate after all.

Hmm.

Anyway.

And now for some random ramblings.

So if The Ombusdman and I lived in Echo Park or it's East Coast equivalent, Brooklyn, we would totally be hipsters.

But alas, we don't (and he works for The Gov'ment, which automatically disqualifies one from any vestiges of hipness) and therefore are relegated to just doing what we like, wearing what we like and eating what we like (Fish tacos mostly. Though, he has recently admitted to craving Big Macs every time he goes running. If he weren't training for a marathon, I wouldn't find that quite as disturbing. Heavens!) in our decidedly un-hip fashion.

We do tend to mingle with the youth of today though (on occasion anyway) since they always seem to have such hiptastic taste. For instance, this weekend we interloped on a little show featuring the only Brooklyn based faux-French pop band I can think of, Les Sans Culottes. A fabstastic musical event chock full of the hipnocenti indeed. (And one I encourage you to check out if they come to your fine city.) It was tres magnifique.

Funny thing about that band. The first time we saw them may have been the first time me and the boy ever really hung out. (Outside of seeing each other at parties, and, apparently, having attended the same high school for a couple of years) So they have a bit of a sentimental tone (though thoroughly upbeat) to my ears. Just brings a girl back, ya know?

Good times. Good times. And so very hip.

But none of that is relevant to this chocolate tart. It was just me, sharing. (Oh heavens, what a bore!) I made it for breakfast today (what?) and in that vein, just had, had, had to share, share, share.

I copped it from the site Cake on the Brain, (who reprinted the original Alice Medrich recipe. Oh that Alice. What a genius!) and then made some switcheroos at my own discretion, and lemme just say, this stuff is da bomb.

Rich, chocolaty goodness. And ready in a snap!

Try it my peaches, and taste the joy.

4 ounces unsalted butter, melted
2 ounces cup sugar
1 teaspoon vanilla
pinch of salt salt
8 ounces flour
8 ounces heavy cream
4 ounces sugar
10 ounces 54% dark chocolate, finely chopped
1 large egg, lightly whisked

Six 4-inch fluted tartlet pans with removable bottoms


Preheat your oven to 350 F.

Stir together the melted butter, sugar, vanilla, and salt in a medium bowl. Mix in the flour just until blended. Divide the dough into 6 equal balls.

Smoosh each ball evenly across the bottom and up the sides of each tart pan.

Arrange the tarts on a baking sheet. Bake for 15 to 20 minutes, until the crusts are a deep golden brown. Meanwhile, make the filling: In a large Pyrex measuring cup (or glass bowl), microwave the cream and sugar until just hot. (This was 1 minute at 70% power in mine. For those of you without an evil microwave, do this on the stovetop.)

Add the chopped chocolate and stir until completely melted and smooth.

Just before the crust is done, whisk the egg into the chocolate mixture.

When the crusts are ready, remove from the oven. Pour the hot chocolate filling mixture into the crusts. Return the tartlets to the oven for 5 to 10 minutes, or just until the filling begins to set around the edges but the center is still liquid when the pans are nudged. Set the sheet on a rack to let the filling cool and set.

Remove the pan sides and bottoms prior to serving.

Serve with coconut whipped cream (as I did) or a nice ice cream.

© 2008 Fresh Approach Cooking
______________________________________
© 2008 Rachael at "Fresh Approach Cooking" www.freshcatering.blogspot.com This RSS Feed is for personal non-commercial use only. If you are not reading this material in your news aggregator, or at the aforementioned url, the site you are looking at might be guilty of infringing upon terms of copyright. This means you choice cooking recipes. Stop stealing my content.

Les Sans Culottes is playing in San Francisco at Cafe du Nord on Tuesday April 8th, check them out! I will be teaching a vegetarian knife skills cooking class that same night at Happy Trails Catering in Pasadena. Which sounds more fun?

Team France took home gold at the World Cup of Baking, ending a 12-year drought. The French squad, denied gold by a team of Americans in the 2005 edition of the triennial Coupe du Monde, brought in a new coach and revamped its training regime in a vigorous effort to restore luster to an emblem of national pride. Bakers from Taiwan finished second, and Italy won bronze. The American team, champions in 1999 and 2005, and the Japanese, winners of the 2002 competition, both finished out of the medals. - WSJ.com